One of the awards you can earn in FIRST is the promote award. The official description is here, but what you do to earn the award is make a PSA for FIRST that follows a prompt, this year “What I’ll carry with me from FIRST…” Here is our video:
1.5.13
Attendance
- Fletcher
- Hunter
- Evan
Journal
Tasks
- Unbend the scissor lift frame
- Attach the scissor lift frame
- Find out why the scissor lift frame bent
Reflections
Evan unbent the scissor lift frame. It was fairly straightforward to fix, though it was decided that we would never want it to happen again.
Then we attached the scissor lift frame back on the robot after it was fixed, we definitely never want this to happen again.
1.3.13 Or: How I Learned to Stop Worrying and Get the Computer from Hunter
Attendance
- Fletcher
Journal
Tasks
- Get robot
- Set up computer to use RobotC
- Test IR autonomous
What Happened
Fletcher went to Evan’s house and got the robot. He then went home and installed RobotC on his computer. He set up a practice field (though it may be low end).
Once all this was done, Fletcher went to the code and made a couple small changes to the IR autonomous, like adding a waitforstart(), and uploaded the program to the robot. Upon running it on the NXT, it read an error: “IRautonomous2.c Bad State!”
The program failed. TeleopHR was ran and it worked fine, so Fletcher thought that perhaps it was the fact that he was using a Mac with a Virtual Machine (VM) rather than a PC. He uploaded a version of TeleopHR that had worked in the past and it read a similar error, except it said TeleopHR.c rather than IRautonomous.c. This confirms that it was the computer rather than the software that was causing the problem. He went searching the internet for a solution, but he came upon none. He went to the RobotC website for help and went on the page explaining how to run RobotC on OS X, and it said that Virtual Box wasn’t supported with their virtual world software, indicating that perhaps they didn’t support Virtual Box too well with RobotC.
12.31.12-Dial F for the Right Function
Attendance
- Fletcher
- Hunter
- Evan
Journal
Tasks
- Assemble field
- Test New Features on Robot
- Driver Practice
- Autonomous Testing
Reflections
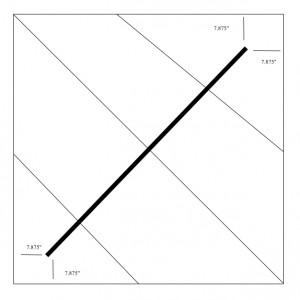
New year’s eve, we built the field in Hunter’s garage so that we could test autonomouses and do driver practice. We found that the rack ends are 7.875″ from a perpendicular on the base board [illustrated]
Once Evan came, we turned the robot on and started driving it. Once it was verified that everything that had worked worked, Fletcher uploaded some new software to account for the new hardware additions, like the servo that makes the hand go up and down, the fork lift peg, and the new hand.
We turned the TeleOp on, and the robot didn’t move an inch. Based on past experience, we told Evan to check all wiring on the robot.
All wiring on the robot was checked, even to the point that the entire wiring setup was disassembled. The robot was still not working. A new mini-TeleOp was written that only used one motor controller, as one the things thought to be the cause of our problem was the series configuration. Each time we had things running on the mini-TeleOp, it worked. We were baffled, why wasn’t our TeleOp working?
Hunter went into the code for TeleOpHR.c (our TeleOp) to comb through and see what was causing the problem.
He found the problem. It was this:
//the_problem.c
int J2Y2 = joystick.joy2_y2;
This creates a variable J2Ys that holds the current value the joystick is returning, or so we thought. It actually only held the first thing the joystick read when the program is turned on, usually 0. This is because this function is only called once, since it isn’t a function and rather a variable. The correct way to do it is this:
//the_solution.c
int J2Y2() { return joystick.joy2_y2; }
This can be called many times, unlike the problem.
After we solved our problems, we shot footage for our Promote award video.
12.29.12-Robots Take what is Given to Them
Attendance
- Evan
Journal
Tasks
- Create LED circuits for weighted ring detection
- Swap out threaded rod drive shafts for a more aggressive one
- Mount the fork lift mechanism
- Mount the vertical bucket adjustment mechanism
Reflections


The new drive shafts are installed. With a 4-1 thread ratio it should take about 40 turns of the shaft to move the slide the entire length of the shaft. The threads are very precise and highly polished and the nut is made from a high-strength, low-friction polymer that moves very smoothly and precisely. We mounted both ends of the drive shafts into precision ball bearings, Purchased from McMaster-Carr, authorized by the First Tech Challenge. The entire mechanism is very smooth, has almost no slop or vibration, and should allow for very precise positioning. It should definitely up our game mechanically. Evan is reassembled the scissor, and then Evan had to finish hooking up the LEDs. This mechanism was cleverly put into place by utilizing the principle of two conductors with weight pressing them together completes the very simple circuit of turning on a light bulb, in this case being an LED. Everything should be ready to test by tomorrow morning. It took a bit longer than Evan had anticipated but it took a bit more engineering than also had been anticipated to design replacement shaft mounts, and Evan had to make totally new slides since the mounting hole spacing of the new nuts was completely different than the old ones. Evan attached 16 screws to the rear of the robot and then realized that it was very unstable and thus added two cross-members for increased strength and stability. Evan also thought the design for the mechanism. Evan also very carefully attached a servo style mechanism which allows for increased accessibility and ease of use.

